| Number of steps: Use the Number slider at the top of the panel to control the number of steps (gradations) in the selected object's fill. The default value of this control is 50. If you're planning on printing your Create image on a high resolution printer, you should select a greater number of steps; you'll be able to see the difference on the printed output even though you can't see a difference on the screen. The default range of the slider is 1-100. You can get a larger number of steps by entering a higher number into the text entry box. To get finer control over the slider, hold the Alternate key while dragging. | ||||||||||||
| Fill Direction Use the Fill direction buttons to control the direction of the fill. | ||||||||||||
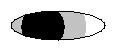
| When you click on the sphere fill button (the round one), another control appears to its left. Click in this control to set the end location for the the fill. If you use a dark to light fill with a large number of gradations, you can get a spherical effect. However, you can also use this control to get other interesting effects. | ||||||||||||
 | ||||||||||||
| Start and End color controls: Use the Start and End color wells to set the colors in the fill. The default start color is black; the end color is white. The colors in the fill will be evenly distributed in the spectrum between these two colors. On gray scale systems, the colors of the fill are evenly distributed between the start and end grays. For more information on how to use the Start and End color wells, please see the description of Start and End color controls at the beginning of the Effects Inspectors section above. | ||||||||||||
| 16 | ||||||||||||